Sell products in increments by setting minimum and maximum quantities as well as the intervals in between.
Through the application of rules based on product categories or per product settings, you can easily sell products by the dozen and set minimum/maximum quantity amounts.
New Features with Version 2.1.3
- Added Custom Quantity Message Option
- Added Out of Stock Min/Max
- Added Role Support, create rules based on user roles
- Improved performance / cacheing
- Improved admin interface
- Allows rules to have a minimum of 0
Features at a glance:
- Get started in minutes
- Set a Minimum product quantity requirement
- Set a Maximum product quantity requirement
- Sell products by a desired increment ie. by two’s or the dozen
- Create product category based rules
- WooCommerce Validation rules tells users what rules they’ve broken directly on the cart or product page
- Set rule priority to layer multiple rules on top of each other
- Built to work with our other plugin WooCommerce Thumbnail Input Quantities plugin.
- Easily override rules on a per-product basis
- Integrates with Woo’s CSV Import Suite
- See which rule is being applied to an individual product on your edit product page

Set Minimum/Maximum quantity values as well as the step values.
Creating and Managing Rules
- Install and activate the plugin using the instructions below.
- Click ‘Quantity Rules’ in your WordPress backend sidebar.
- Click ‘Add New Rule’
- Select the categories, tags, roles etc. you would like to apply your rule to and set then fill in the correct quantity values.
- Click ‘Save Post’ and you’re done!
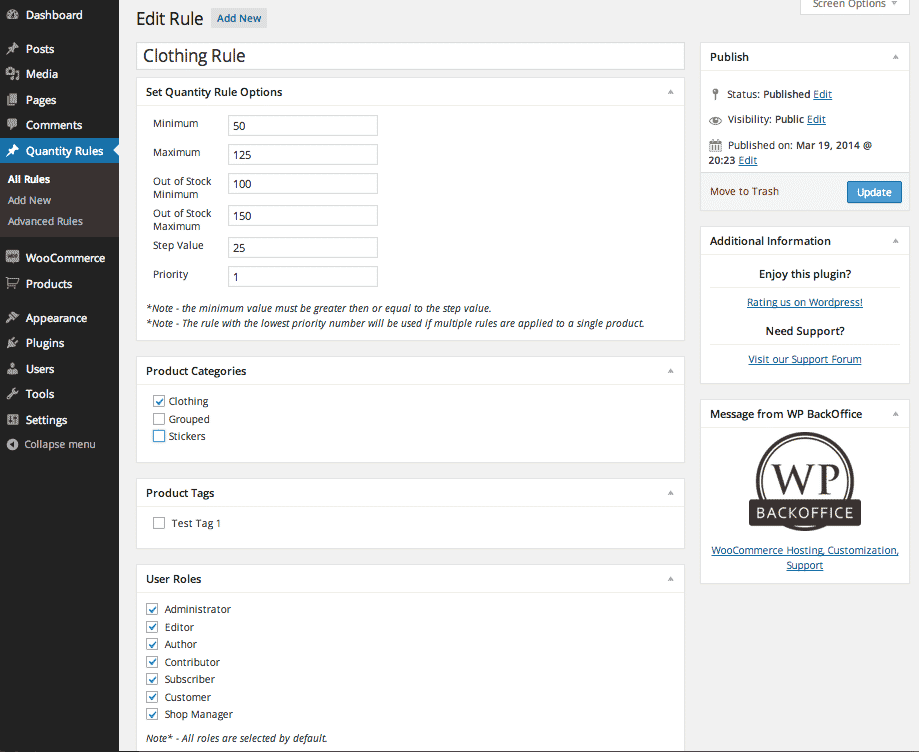
Set your rule’s values and select the categories you would like to apply your rule to.
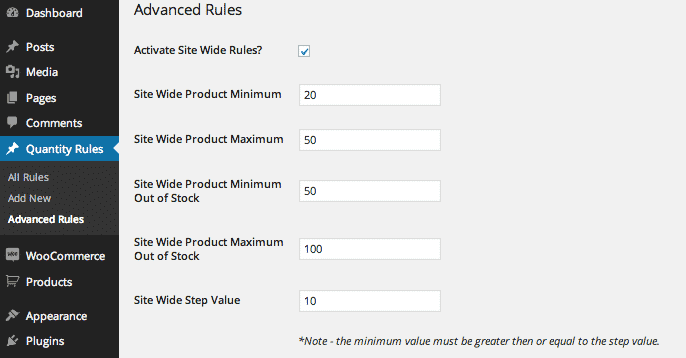
Creating Site Wide Rules
- Navigate to Quantity Rules -> Advanced Rules.
- Click the checkbox and then save to activate site wide rules.
- When the page refreshes, insert your Min, Max and Step values into the boxes.
- Click ‘Update Settings’ and your done!
Advanced Rules Admin Screen
Using Quantity Message
- Navigate to Quantity Rules -> Advanced Rules.
- Click the notification checkbox
- Select the position you’d like to display the message
- Configure your messages using the %value% options presented
- Optionally add a custom css class for your own styles
- Update the page and your done!
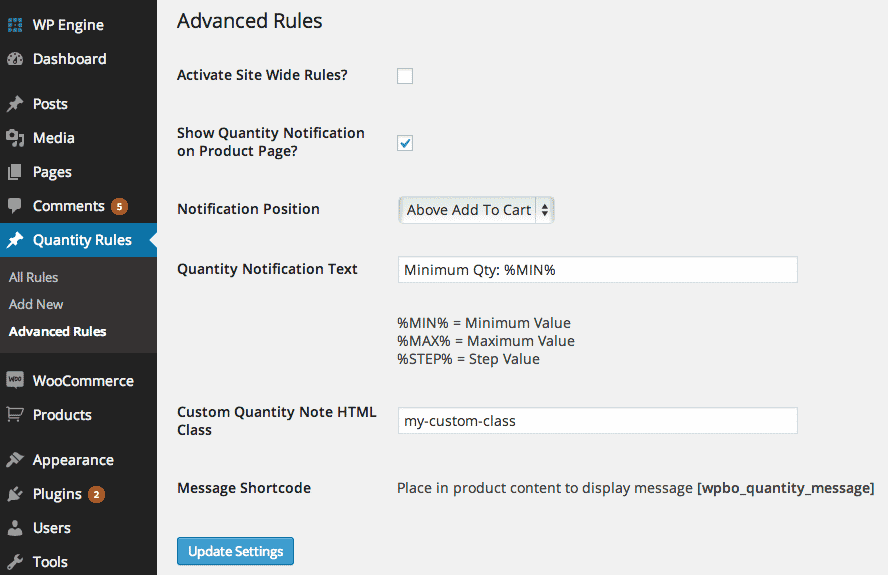
Configure where you quantity message will display and how it will look.
Quantity Message Shortcode
Some themes remove the hook our plugin uses to display this message. If you’ve activated the message and don’t see it on your product page you can use the following shortcode to manually display it.
Shortcode: [wpbo_quantity_message]
PHP Usage: do_shortcode(‘[wpbo_quantity_message]’);
Override Rules on a Per-Product Basis
- Navigate to the edit product page of the product you would like to edit.
- Find the ‘Product Quantity Rules’ metabox and click ‘Override Quantity Rules with Values Below’.
- Fill in the appropriate values below the checkbox.
- Update your product and that’s it.
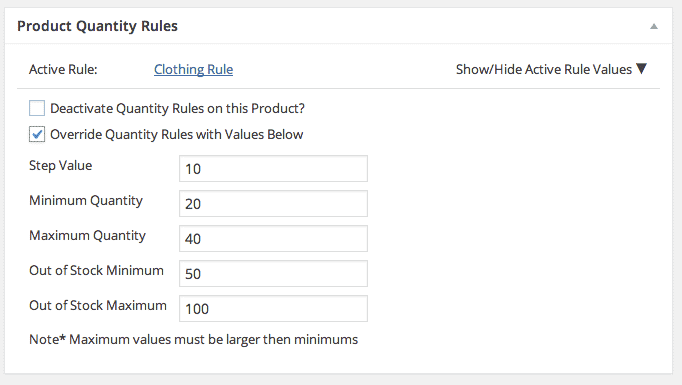
Manually override quantity rules on a per-product basis.
Deactivate Quantity Rules on a Per-Product Basis
- Navigate to the product edit page that you would like to deactivate quantity rules for.
- Find the ‘Product Quantity Rules’ metabox and click ‘Deactivate Quantity Rules for this Product’.
- Update the product and that’s it.
Using Out of Stock Functionality
If your product is under inventory control, you change your quantity rules based on whether your product is in our out of stock. To do this simply fill in the rule values like you have always done and when once your product it out of stock, the out of stock values will take the in stock value’s place.
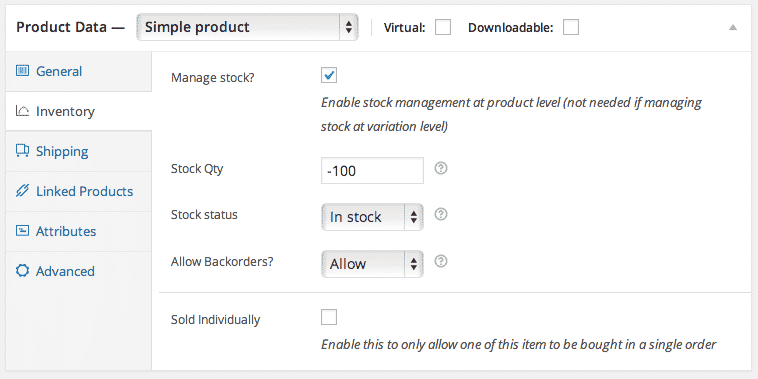
Your product’s inventory settings must be set like this for the out of stock values to appear.
Integration with Woo’s CSV Import Suite
Adding rules on a per-product basis using Woo’s CSV Import Suite is as simple as adding a few additional meta values to your import file. When exporting data be sure to ‘include hidden meta data’ or these meta values won’t appear.
| Function | Meta Value/Column Head | Acceptable Values |
|---|---|---|
| Override Rules | ‘meta:_wpbo_override’ | ‘on’ will override rules with your per-product meta values otherwise leave this value empty |
| Minimum Quantity | ‘meta:_wpbo_minimum’ | Any positive integer |
| Maximum Quantity | ‘meta:_wpbo_maximum’ | Any positive integer |
| Minimum Quantity (Out of Stock) | ‘meta:_wpbo_minimum_oos’ | Any positive integer |
| Maximum Quantity (Out of Stock) | ‘meta:_wpbo_maximum_oos’ | Any positive integer |
| Step Value | ‘meta:_wpbo_step’ | Any positive integer |
| Deactivate Rules | ‘meta:_wpbo_deactive’ | ‘on’ will deactivate rules for that product otherwise leave this value empty |
Installation
Automatic WordPress Installation
- Log-in to your WordPress Site
- Under the plugin sidebar tab, click ‘Add New’
- Search for ‘WooCommerce Incremental Product Quantities’
- Install and Activate the Plugin
- Set Rules for categories by clicking the new ‘Quantity Rules’ sidebar option or assign per-product rules by using the new metabox on your product page.
Manual Installation
- Download the latest version of the plugin from WooCommerce Incremental Product Quantities WordPress page.
- Uncompress the file
- Upload the uncompressed directory to ‘/wp-content/plugins/’ via FTP
- Active the plugin from your WordPress backend ‘Plugins -> Installed Plugins’